Category Archives: WinCC Unified

Capturing WinCC Unified Traces to Elasticsearch

In industrial automation, logging and monitoring are crucial for maintaining system health and troubleshooting issues. Siemens WinCC Unified provides built-in tracing capabilities that. In this post I will show how to capture that traces to Elasticsearch to allow seamless log collection, storage, and visualization.

Step 1: Capturing WinCC Unified Traces

WinCC Unified provides a trace tool that simplifies the process of collecting traces. The tool allows logs to be written to files, which can then be read by Logstash (a tool to process log files).

In that example we will write the log files to C:\Tools\logstash-siemens\logs directory.

"C:\Program Files\Siemens\Automation\WinCCUnified\bin\RTILtraceTool.exe" -mode logger -path C:\Tools\logstash-siemens\logs

Step 2: Collecting Logs with Logstash

Create a Logstash configuration file (e.g., C:\Tools\logstash-siemens\logstash.conf) with the following setup:

input {
  file {
    path => "C:/Tools/logstash-siemens/logs/*.log"  # Use forward slashes for Windows paths
    start_position => "beginning"
    sincedb_path => "C:/Tools/logstash-siemens/sincedb"  # Save the reading state
    codec => plain {
      charset => "UTF-8"
    }
  }
}

filter {
  # Drop empty lines
  if [message] =~ /^\s*$/ {
    drop { }
  }

  # Add a custom field to identify the log source
  mutate {
    add_field => { "Source" => "WinCC Unified" }
  }

  # Use dissect to parse the log format correctly
  dissect {
    mapping => {
      "message" => "%{#}|%{Host}|%{System}|%{Application}|%{Subsystem}|%{Module}|%{Severity}|%{Flags}|%{Timestamp}|%{Process/Thread}|%{Message}"
    }
	  remove_field => ["message"]
  }

  # Remove leading and trailing spaces
  mutate {
    strip => ["#", "Host", "System", "Application", "Subsystem", "Module", "Severity", "Flags", "Timestamp", "Process/Thread"]
  }

  # Convert timestamp to @Timestamp (ensure it matches your log format)
  date {
    match => ["Timestamp", "yyyy.MM.dd HH:mm:ss.SSS"]
    target => "@timestamp"
    timezone => "UTC"
    locale => "en"  # Add locale to avoid parsing issues due to different formats or locales
  }
}

output {
  # stdout {
  #   codec => json_lines
  # }

  # Elasticsearch output (uncomment to enable)
  elasticsearch {
     hosts => ["http://linux0:9200"] # Change it to your Elasticsearch host
     index => "wincc-traces-%{+YYYY.MM}"
     # user => "elastic"
     # password => "elastic"
  }
}

Start Logstash to collect log files. First, download Logstash (https://www.elastic.co/downloads/logstash) and extract it to C:\Tools.

Then, run the following command to start Logstash using the specified configuration file:

C:\Tools\logstash-8.17.3\bin\logstash.bat -f C:\Tools\logstash-siemens\logstash.conf

Forwarding Traces from WinCC Unified Panels


For WinCC Unified Panels, trace forwarding can be enabled, allowing traces to be captured with the WinCC Unified trace tool on a PC. The traces will then be also be written to files on the same PC (by the tool you started at Step 1).

“C:\Program Files\Siemens\Automation\WinCCUnified\bin\RTILtraceTool.exe” -mode receiver -host -tcp

Step 4: Visualizing Logs in Kibana

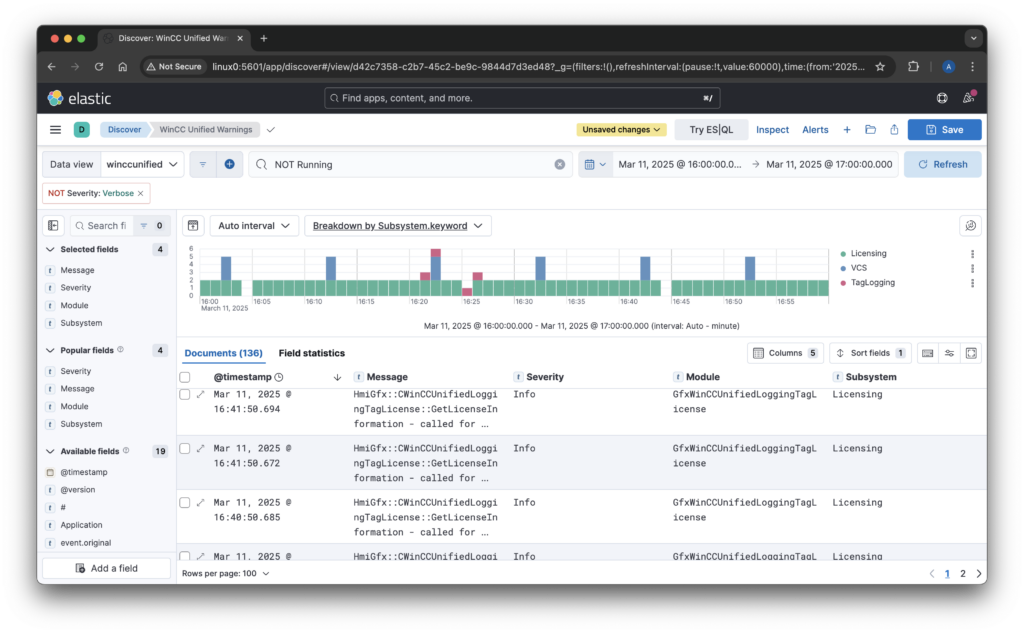
Once logs are stored in Elasticsearch, Kibana provides a powerful interface to explore and analyze them.

  1. Open Kibana and navigate to Stack Management > Index Patterns.
  2. Create a new index pattern matching wincc-traces-*.
  3. Use Discover to explore logs and apply filters.
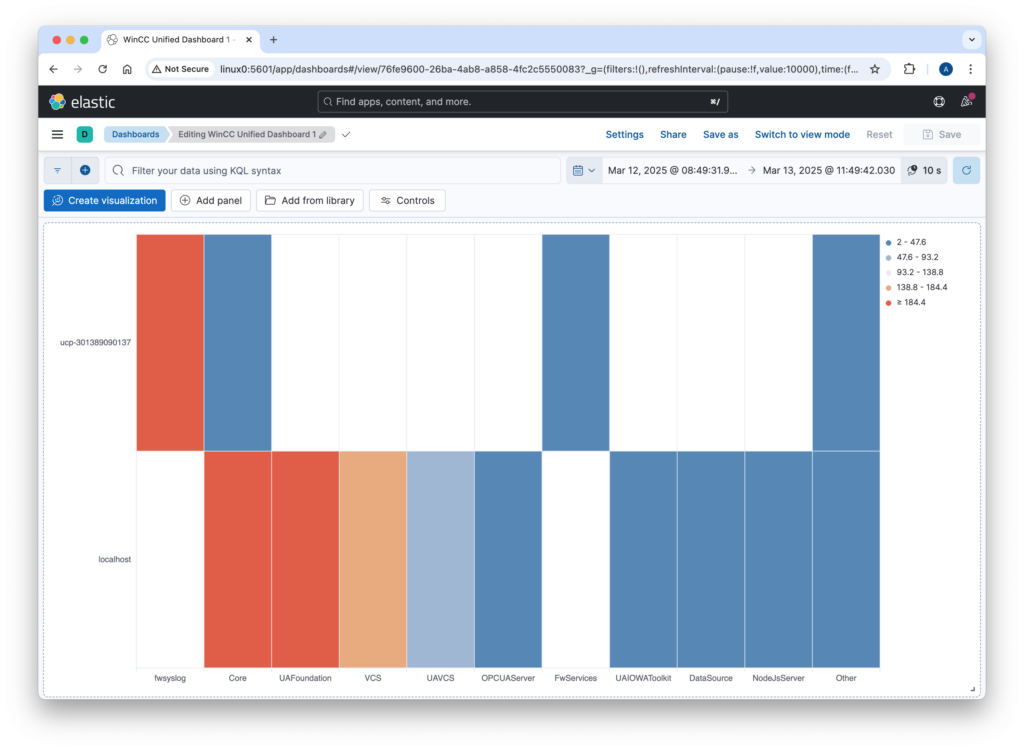
  4. Create dashboards and visualizations to monitor system health and performance.

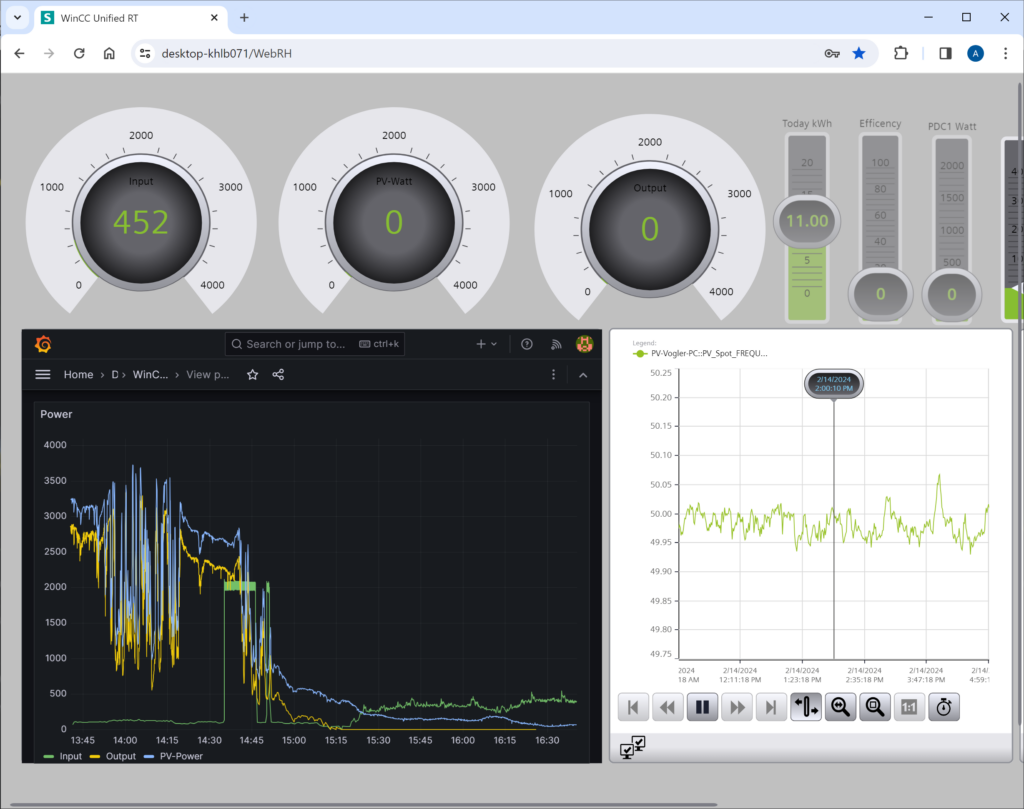
Embed Grafana in WinCC Unified

In this scenario we will host Grafana over the IIS from WinCC Unified. So that it comes from the same origin and that we do not come over a CORS (Cross-Origin Request Blocked) problem.

What is needed to allow Grafana to be embedded in another application is to set allow_embedding = true in the Grafana configuration file.

To host Grafana over the IIS the following settings must be made:

Add a URL Rewrite to your IIS configuration file. Change “desktop-khlb071” to your computer where Grafana is running on. Restart the Webpage with the IIS Manager.

The IIS configuration file can be found here: (C:\Program Files\Siemens\Automation\WinCCUnified\SimaticUA\web.config)

                <rule name="grafana" enabled="true" stopProcessing="false">
                    <match url="grafana(/)?(.*)" ignoreCase="true" />
                    <action type="Rewrite" url="http://desktop-khlb071:3000/{R:0}" appendQueryString="true" logRewrittenUrl="false" />
                </rule>      

Change the following configuration of Grafana (defaults.ini). Change the domain to your computer name where Grafana is running on. It must be the same name what you use in the IIS configuration file!

# The public facing domain name used to access grafana from a browser
domain = desktop-khlb071

# Redirect to correct domain if host header does not match domain
# Prevents DNS rebinding attacks
enforce_domain = false

# The full public facing url
root_url = %(protocol)s://%(domain)s:%(http_port)s/grafana

# Serve Grafana from subpath specified in `root_url` setting. By default it is set to `false` for compatibility reasons.
serve_from_sub_path = true

# set to true if you want to allow browsers to render Grafana in a <frame>, <iframe>, <embed> or <object>. default is false.
allow_embedding = true

WinCC Unified V18 exposed to the Internet…

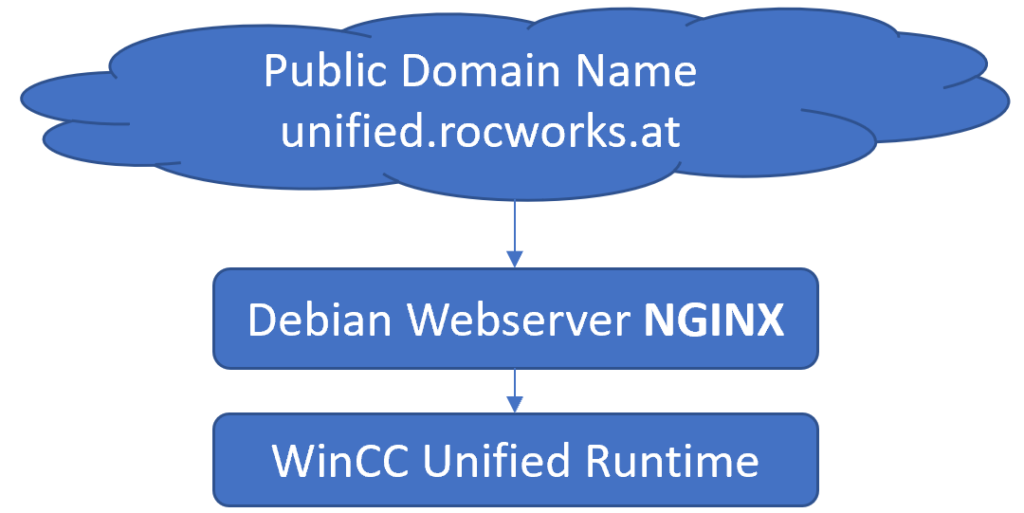
This article will show how WinCC Unified can be accessed through a public available server in the internet.

Disclaimer: I only did this for testing and demo purposes!!!

First you need to have a public domain name and a public accessible host. Or a host running somewhere in the cloud and you will get a IP and/or an URL, which will point to your host. In my case I have a public IP address from my internet provider and my public sub domain name points to my server at home.

My registered public domain name is rocworks.at. Additionally I have used a sub-domain name unified.rocworks.at. Because I have multiple services running on my machine at home. With the subdomain the service can be easily be distinguished. At my internet provider I have configured a DDNS services, so that my subdomain unified.rocworks.at points to my IP at home. You can also use other DDNS services (noip.com) , also if you have a dynamic IP address.

If you have it running at home, then you have to setup a port forwarding from your modem to your web server IP at home.

At the WinCC Unified Runtime Host we have to change some settings in files, to set the right public URL for the identity provider (UMC). After doing this, you should reboot the computer.

Config.level (C:\Program Files\Siemens\Automation\WinCCUnified\config)

	[IdentityProvider]
	Url = "https://unified.rocworks.at/umc-sso/"
	
Web.config (C:\Program Files\Siemens\Automation\WinCCUnified\WebRH)

	<appSettings>
	    <add key="appvirtdir" value="/WebRH" />
	    <add key="origins" value="https://unified.rocworks.at" />
	  </appSettings>

Config.json (C:\Program Files\Siemens\Automation\WinCCUnified\SimaticUA)

        "dnsname": "unified.rocworks.at"

Umcd.cfg (C:\Program Files\Siemens\LocalUserManagement\etc)

	Search and replace hostnames

HKEY_LOCAL_MACHINE\SOFTWARE\Siemens\User Management\WebUI\Settings

        ipaddress = "https://unified.rocworks.at/umc-sso/"

Note: instead of "unified.rocworks.at" use your public domain name. 
    

At the web server at home I have NGINX running in a Docker Container together with Let’s Encrypt. With Let’s Encrypt and Certbot we can get valid Certificates for our Webserver. But that’s another story. Here is a docker-compose.yml file for NGINX and Let’s Encrypt:

version: '3'
services:
  nginx:
    image: nginx
    restart: unless-stopped
    ports:
      - 80:80
      - 443:443
    volumes:
      - ./data/www:/var/www
      - ./data/letsencrypt:/etc/letsencrypt
      - ./config:/etc/nginx/conf.d
       
    command: "/bin/sh -c 'while :; do sleep 6h & wait $${!}; nginx -s reload; done & nginx -g \"daemon off;\"'"

  certbot:
    image: certbot/certbot
    restart: unless-stopped
    volumes:
      - ./data/www:/var/www
      - ./data/letsencrypt:/etc/letsencrypt
    entrypoint: "/bin/sh -c 'trap exit TERM; while :; date; do certbot renew --webroot -w /var/www/certbot; sleep 12h & wait $${1}; done;'"

Before you start with a new sub domain you have to initially get a certificate:

docker run --rm -ti -v $PWD/data/www:/var/www -v $PWD/data/letsencrypt:/etc/letsencrypt certbot/certbot certonly --webroot -w /var/www/certbot -d <your-public-domain-name> --email <your-email-address>

NGINX Configuration: default.conf :

server {
        listen 80;
        server_name unified.rocworks.at;
        location /.well-known/acme-challenge/ {
            root /var/www/certbot;
        }
        location / {
            root /var/www/html;
        }
}

NGINX Configuration: unified.conf:

server {
        server_name unified.rocworks.at;

        root /var/www/html;
        index index.html index.htm;

        location / {
            proxy_pass https://<ip-of-wincc-unified-host>/;
            proxy_http_version 1.1;
            proxy_set_header Upgrade $http_upgrade;
            proxy_set_header Connection 'upgrade';
            proxy_set_header Host $host;
            proxy_cache_bypass $http_upgrade;
        }

        location /umc-sso {
            proxy_pass https://<ip-of-wincc-unified-host>/umc-sso;
            proxy_http_version 1.1;
            proxy_set_header Upgrade $http_upgrade;
            proxy_set_header Connection 'upgrade';
            proxy_set_header Host $host;
            proxy_cache_bypass $http_upgrade;
            proxy_buffer_size 128k;
            proxy_buffers 4 256k;
            proxy_busy_buffers_size 256k;
        }

        #location /graphql { # Optionally you can also publish GraphQL
        #    proxy_pass http://<ip-of-wincc-unified-host>:4000/graphql;
        #    proxy_http_version 1.1;
        #    proxy_set_header Upgrade $http_upgrade;
        #    proxy_set_header Connection 'upgrade';
        #    proxy_set_header Host $host;
        #    proxy_cache_bypass $http_upgrade;
        #}
        

        listen 443 ssl; # managed by Certbot
        ssl_certificate /etc/letsencrypt/live/unified.rocworks.at/fullchain.pem; # managed by Certbot
        ssl_certificate_key /etc/letsencrypt/live/unified.rocworks.at/privkey.pem; # managed by Certbot
        include /etc/letsencrypt/options-ssl-nginx.conf; # managed by Certbot
        ssl_dhparam /etc/letsencrypt/ssl-dhparams.pem; # managed by Certbot
}

GraphQL for Unity with WinCC Unified

In this post I will show how data from WinCC Unified V18 can be brought into Unity with the GraphQL for Unity Pro Asset.

First you need WinCC Unified V18 with the GraphQL Server. The GraphQL server comes out of the box with the new version and should be up and running automatically when you download and start your runtime. You should see a process “WCCILgraphQLServer.exe” in your task manager.

In Unity you have to create a project and download the GraphQL for Unity Pro Asset in the Package Manager.

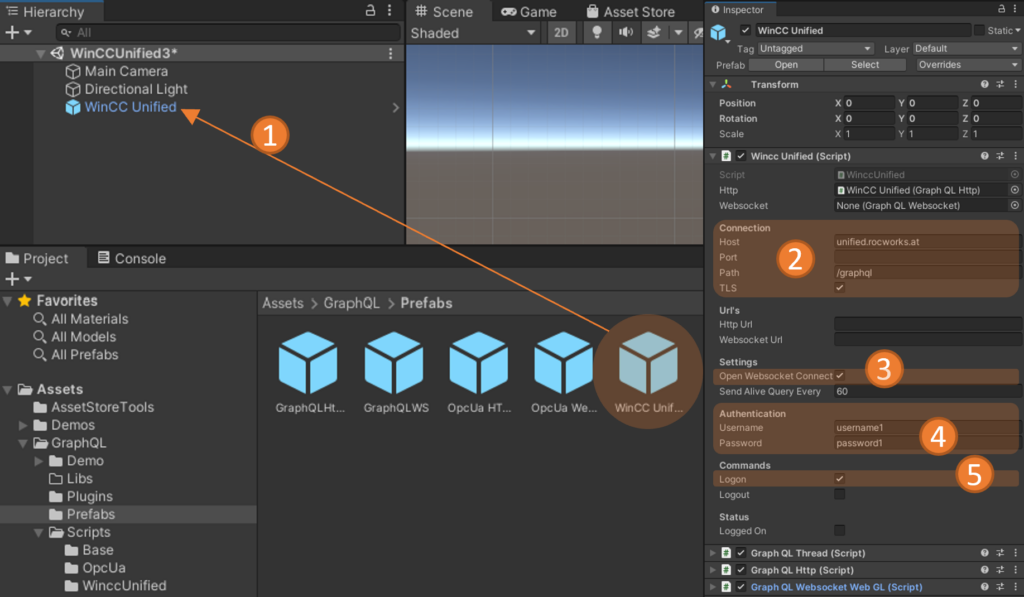
  1. Prefab: Drag and drop the WinCC Unified Prefab from the Prefabs folder into your scene.
  2. Connection: In the properties you have to set your GraphQL Host, optionally the port, the path (typically /graphql), and if you want to have a secured TLS connection (HTTPS, WSS).
  3. Websocket: If you want to subscribe to tag value changes, then you have to open additionally a Websocket connection. Without the Websocket connection you can still read and write tag values, but a subscription to tag value changes is not possible.
  4. Authorization: Set the username and password to connect to WinCC Unified (at the time of writing, this user must have the role HMI Administrator).
  5. Logon: Check the “Logon” checkbox, if you want to start the connection at startup (you can also set this “on-demand” during runtime in your code.

Then you can already start the project in the editor to see if the connection can be established. If everything works fine, then the “Logged On” property turns to checked.

Now you can create your own C# script and read/write/subscribe tag values in an easy way in C# scripting. In that case I have simple added the script as additional component to the WinCC Unified GameObject (Prefab).

using System;
using System.Collections;
using System.Collections.Generic;
using UnityEngine;
using GraphQLWinccUnified;
using Newtonsoft.Json.Linq;

public class WinccUnified3 : MonoBehaviour
{
    private WinccUnified _connection;
    private bool _ready;

    // Start is called before the first frame update
    void Start()
    {
        _connection = GetComponent<WinccUnified>();
    }

    // Update is called once per frame
    async void Update()
    {
        if (!_ready && _connection.IsWebsocketReady()) 
        {
            _ready = true;

            // SubscribeTagValues
            _connection.SubscribeTagValues(
                new string[] { "HMI_String_1" }, 
                data => { Debug.Log(data.GetValue<string>()); });

            // WriteTagValues
            await _connection.WriteTagValues(
                new string[] { "HMI_String_1" },
                new JValue[] { new JValue("Hello World!") },
                new DateTime[] { DateTime.Now });

            // ReadTagValues
            var result = await _connection.ReadTagValues(
                new string[] { "HMI_String_1" });
            Debug.Log(result[0].GetValue<string>());
        }
    }
}

If you deal with with a self-signed certificate, then you must uncheck “Validate Certificate” at the “Graph QL Http” Component. But the Websocket connection in Unity does not yet support self-signed certificates. So, it is better to use an insecure connection. Typically the GraphQL port is 4000, so be sure to set the Port to 4000. And don’t forget to open the firewall for that port on the host where the Unified runtime is running.

WinCC Unified GraphQL Server for Data Integration

With the GraphQL Server in WinCC Unified V18 we can now integrate various (IT) data platforms with simple programs. Those programs can be written in Python, Java, Kotlin, Go, JavaScript, or whatever kind of programming language you prefer.

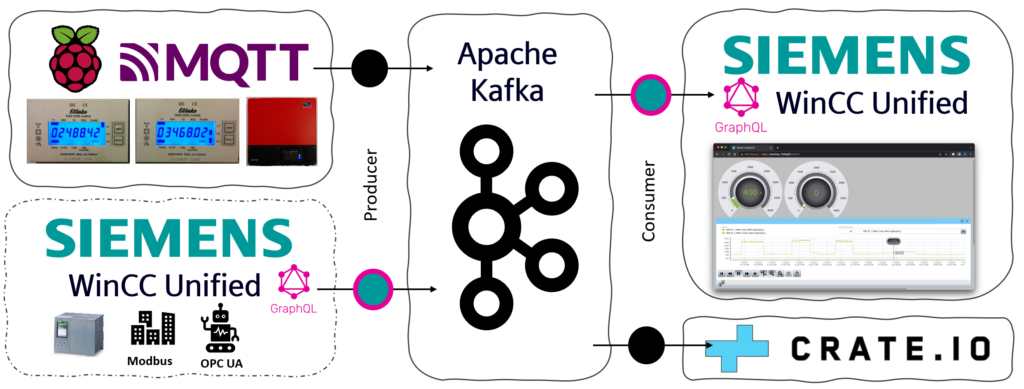
In my case I have used Kotlin to implement a simple Apache Kafka Consumer, which maps and writes values from my Home-Automation to the WinCC Unified SCADA system.

I can now use WinCC Unified for visualisation, even if I don’t have any PLC at home. WinCC Unified can be used as a Low- or No-Code platform to create fancy Web-Based visualisations with real-time values from any kind of data source.

WinCC Unified also has great alarming features. Alarm handling can be done in WinCC Unified and alerts could also be published back to the streaming platform with a producer.

I collect my Home-Automation values from a Raspberry Pi, which reads values from power meters, temperature sensors, or data via Bluetooth from my PV Converter. The values are published to a MQTT Broker. And from that MQTT Broker I bring my values to Apache Kafka and then to the WinCC Unified system.

With the GraphQL Server of WinCC Unified it would also be easily possible to implement an Apache Kafka Producer, so that values from PLC’s can easily be published to Apache Kafka, or any other data streaming platform.

From Apache Kafka I write my values to WinCC Unified and additionally to a CrateDB. CrateDB is a great NoSQL database with the power of SQL and it is highly scalable. It can be used for data analytics, machine learning, Grafana Dashboard, and more…

For sure you can also grab the data directly from the MQTT broker and bring it directly into WinCC Unified via the GraphQL Server without a streaming platform, but a streaming platform has additional benefits, which are not covered in this post…

Enable OPC UA Server in WinCC Unified

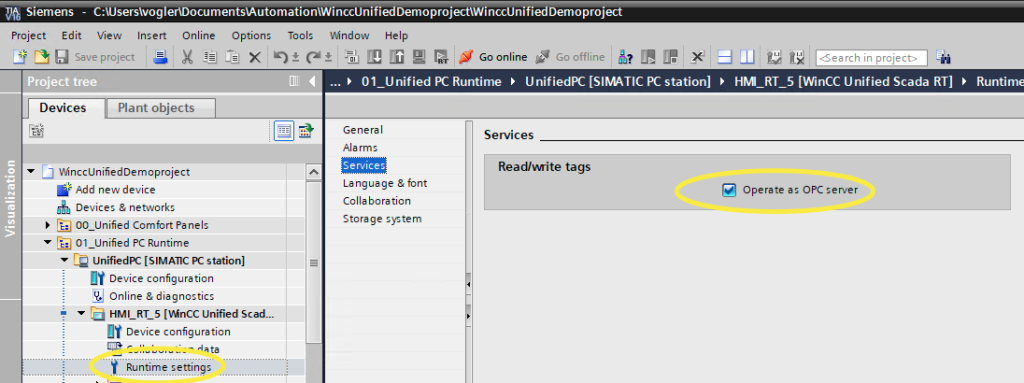
In the TIA Portal you have to enable “Operate as OPC Server” in the Runtime Settings of your project. Download and restart the runtime, and then the OPC UA Server is listening on opc.tcp://localhost:4890.

You need to have a user which has a role with the OPC-UA read and write access permission.

When you try to connect with a client the client will send the certificate to the server and typically the certificate is rejected by the server. To trust the certificate you have to move the certificate from the “Rejected” folder to the “Trusted” folder.

C:\Program Files\Siemens\Automation\WinCCUnified\bin\PKI\Rejected\certs

C:\Program Files\Siemens\Automation\WinCCUnified\bin\PKI\Trusted\certs

How to disable security in WinCC Unified OPC UA Server…

Caution! Don’t do this in a productive environment!

Add a security police “None” to the OPC UA configuration file.

On Windows you can find the file here: “C:\Program Files\Siemens\Automation\WinCCUnified\bin\OpcUaServerRTIL.xml”

<SecurityProfileUris>
<SecurityProfile>
<ProfileUri>http://opcfoundation.org/UA/SecurityPolicy#None</ProfileUri>
<Enabled>true</Enabled>
</SecurityProfile>
...
</SecurityProfileUris>